Install DKIM on Exchange Server 2019 and Windows Server Core without desktop experience installed
To enable DKIM signature on Exchange 2019 and Server Core without desktop experience installed, you should download the DKIM Installer , and then run it under DOS command or PowerShell.
Remote desktop installation is supported, but running the installer by Windows Admin Center -> PowerShell remotely is not supported.
DOS command:
eaxchdomainkeys.exe
PowerShell:
./eaexchdomainkeys.exe
Slient Installation
DKIM installer supports silent mode, you can use the following command to start silent installation.
DOS command:
start /wait eaxchdomainkeys.exe /S
PowerShell:
start eaexchdomainkeys.exe -ArgumentList /S -Wait
Installer Command Arguments
The following arguments are case-sensitive.
- /s or /S runs the installer or uninstaller silently.
- /exchange installs DKIM on Exchange Server only, ignore IIS SMTP service.
- /iis installs DKIM on IIS SMTP service only, ignore Exchange Server.
- /manager installs DKIM management tools only.
DKIM Management Shell
Because DKIM Manager doesn’t support server core without desktop experience installed, so you should use “DKIM Management Shell” to manage DKIM configuration.
Use DKIM Manager with Server Core
If you would like to manage DKIM using GUI Manager, there is an alternative solution:
You can run DKIM installer on a client machine (Windows 7 - Windows 10) without Exchange Server installed, the DKIM management tool will be installed.
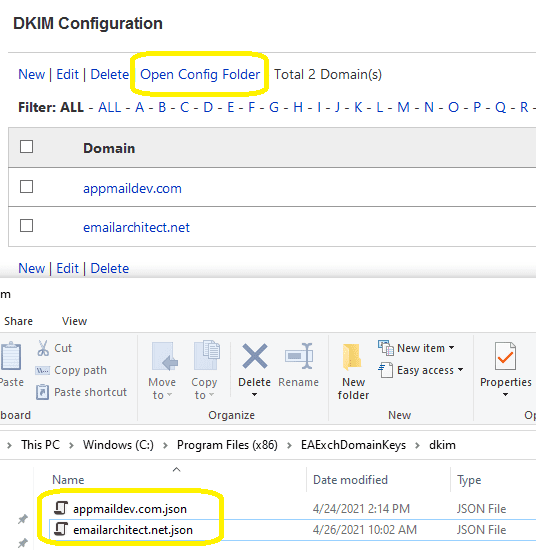
After the DKIM manager is installed, open DKIM manager and create domain(s),
then click “Open Config Folder”, find [domain].json files in config folder,
copy those files to Your Exchange Server\DKIM installation path\dkim,
then your Exchange Server has the same configuration.

The default installation path is: C:\Program Files (x86)\EAExchDomainKeys.
Deploy Public Key and Test DKIM
Appendix: DKIM installation
C#, VB.NET can be used to manage DKIM programmingly.
You can find the full sample project in DKIM installation path\DkimConfigSample.
Free Email Support
Not enough? Please contact our technical support team.
Remarks
We usually reply emails within 24hours. The reason for getting no response is likely that your smtp server bounced our reply. In this case, please try to use another email address to contact us. Your Gmail, Hotmail or Office 365 email account is recommended.
