Managed C++/CLI - DomainKeys and DKIM signature
The following example codes demonstrate how to add DomainKeys and DKIM signature to email and send it using SMTP server.
DKIM and DomainKeys
DomainKeys is a technology proposal that can bring black and white back to this decision process by giving email providers a mechanism for verifying both the domain of each email sender and the integrity of the messages sent. But DomainKey is deprecated by DKIM now,
DKIM is a similar technology as Domainkeys. To learn more detail about DKIM, please refer to RFC4871.
Before you can add DKIM signature to email, you need to generate the DKIM configuration file like this:
Download Json Configuration File for your DomainKeys/DKIM key pair
Please click here to go to this online tool at first. Then input your email sender domain in it and click “Download Configuration Json” and save the downloaded json file to your local disk. This file contains your DomainKeys and DKIM key pair.
Deploy Public Key
Once you get the json file, you can open it by notepad, and find the public key:
{
"CanonAlgorithm": 0,
"Domain": "emailarchitect.net",
"IsActive": true,
"IsSignPartOfMessage": false,
"RsaHashAlgorithm": 1,
"Selector": "s1024",
"PublicKey":"MIGfMA0GCSqGSIb3DQEBAQUAA4GNADCBiQKBgQCydEgD9oTri865iNJqFVPJLEOW/uOHpjnnhMeGQQDodx/LqHlbs9iz3A95lXmFSlPgxCYNzGJPdqM7XXZnQCkaBO7DmKPJqdhgfOAECHOiT/5oXW9qMdQOymVdgy2iu2ZjKR2eXPnqYUHQycfQP82QigP3dLSi78xkruKlqlXvlQIDAQAB",
"PrivateKey":"-----BEGIN PRIVATE KEY-----\nMIICdQIBADANBgkqhkiG9w0BAQEFAASCAl8wggJbAgEAAoGBALJ0SAP2hOuLzrmI0moVU8ksQ5b+44emOeeEx4ZBAOh3H8uoeVuz2LPcD3mVeYVKU+DEJg3MYk92oztddmdAKRoE7sOYo8mp2GB84AQIc6JP/mhdb2ox1A7KZV2DLaK7ZmMpHZ5c+ephQdDJx9A/zZCKA/d0tKLvzGSu4qWqVe+VAgMBAAECgYAlZirAj93H+pciuYq1ek5CqzDoGHeJUnwwqdph58YfsfV7Kk3yusSH3y7sEXg0B8F/6cO64RJaanfnpVz+4wqpxGa6bHQAfpqdWG4qaWcrsw7F9LVFF2coRWog9UvfTn/rDObt8j6eGAvVBrl+B3t5zoxSyZ4wrRWMkeFbdeIukQJBAN4Zvol1ApV4qLAjcRW9/FilPeKqWUMSe2TT6Mf46Ztxb9QrN60GIVvfRuJ+gqyu8V41GDnNZ5Wvl0EaIFgvY6UCQQDNsR6z9y7/oHcziMsm+w63ixljWbu+xTwsxdaTzBi/y3gEDy18cB5krDsPX55KbF99tG0weahpgjffOuMZCdkxAkBRSlTt1LDsamw7g81ZKt9Yxqo+8yCWpwYY4mLaBmXiagOHQYYwQwUkrjUwoyNK9wEK/R3v0hlutQUEY/6gqD+tAkAcCWl69FVmqJO25Y1zWcMux3oFbcTGgxHptGnEKYyyD+TjAMKddJbf+A3w0YK8+Dqn4sEDW4HWJ9a/ycIMtqfxAkAlACleKXlrLMSAcSB+8SB3SukdP+8fQtIG2x0z+qWn/7MKTFF5TYaARRBZHtMGXlK+PP0PZG7XIwFc9CSE/0PT\n-----END PRIVATE KEY-----\n",
"SignedHeaders": "sender:from:to:cc:date:subject:mime-version:content-type:message-id:in-reply-to",
"SignPartMessageLength": 0
}
You should set a TXT record in your domain DNS server. For example: your selector is s1024, your domain is emailarchitect.net, and then you should create a TXT record for s1024._domainkey.emailarchitect.net and set the following content in the record.
s1024._domainkey.emailarchitect.net      text =

        "v=DKIM1; k=rsa; p=MIGfMA0GCSqGS...hSinuQIDAQAB"
To learn more detail about Public Key deployment, please refer to https://www.emailarchitec.net/domainkeys/kb
Sections:
Installation
Before you can use the following codes, please download EASendMail SMTP Component and install it on your machine at first. Full sample proejcts are included in this installer.
Install from NuGet
You can also install the run-time assembly by NuGet. Run the following command in the NuGet Package Manager Console:
Install-Package EASendMail
Note
If you install it by NuGet, no sample projects are installed, only .NET assembly is installed. And you also need to get a trial license code from here instead of using “TryIt”.
Add reference
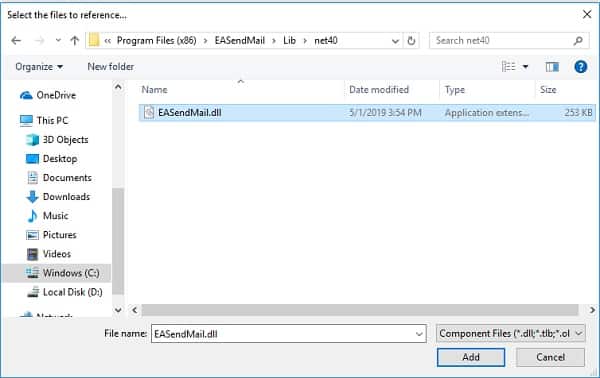
To use EASendMail SMTP Component in your project, the first step is Add reference
of EASendMail to your project. Please create or open your project with Visual Studio,
then go to menu -> Project -> Add Reference -> .NET -> Browse..., and select
Installation Path\Lib\net[version]\EASendMail.dll from your disk, click Open -> OK, the reference of EASendMail
will be added to your project, and you can start to use it to send email
in your project.

.NET assembly
Because EASendMail has separate builds for .Net Framework, please refer to the following table and choose the correct dll.
Separate builds of run-time assembly for .NET Framework 2.0, 3.5, 4.0, 4.5, 4.6.1, 4.7.2, 4.8.1, .NET 6.0, .NET 7.0, .NET 8.0, .NET Standard 2.0 and .NET Compact Framework 2.0, 3.5.
| File | .NET Framework Version |
| Lib\[net20|40|45|461|472|481]\EASendMail.dll |
Built with .NET Framework 2.0, 4.0, 4.5, 4.6.1, 4.7.2, 4.8.1
It requires .NET Framework 2.0, 3.5 or later version. |
| Lib\[net6.0|7.0|8.0]\EASendMail.dll |
Built with .NET 6.0, .NET 7.0, .NET 8.0
It requires .NET 6.0 or later version. |
| Lib\netstandard2.0\EASendMail.dll |
Built with .NET Standard 2.0
It requires .NET Standard 2.0 or later version. |
| Lib\[net20-cf|net35-cf]\EASendMail.dll |
Built with .NET Compact Framework 2.0, 3.5
It requires .NET Compact Framework 2.0, 3.5 or later version. |
C++/CLI - DomainKeys and DKIM signature - example
The following example codes demonstrate sending email with DomainKeys and DKIM signature.
In order to run it correctly, please change SMTP server, user, password, sender, recipient value to yours.
Note
To get full sample projects, please download and install EASendMail on your machine.
#include "stdafx.h"

using namespace System;
using namespace EASendMail;

int main(array<System::String ^> ^args)
{
    try
    {
        // load DKIM configuration file
        DkimConfig ^dkimConfig = gcnew DkimConfig();
        dkimConfig->LoadFromFile("d:\\myfolder\\emailarchitect.net.json");

        SmtpMail ^oMail = gcnew SmtpMail("TryIt");

         // Assign DkimConfig object to SmtpMail
        oMail->DkimSignerConfig = dkimConfig;

        // Set sender email address, please change it to yours
        oMail->From = "test@emailarchitect.net";

        // Set recipient email address, please change it to yours
        oMail->To = gcnew AddressCollection("support@emailarchitect.net");

        // Set email subject
        oMail->Subject = "test email from Managed C++/CLI with DKIM";

        // Set email body
        oMail->TextBody = "this is a test email sent from Managed C++ project, do not reply";

        // Your SMTP server address
        SmtpServer ^oServer = gcnew SmtpServer("smtp.emailarchitect.net");

        // User and password for ESMTP authentication, if your server doesn't require
        // User authentication, please remove the following codes.
        oServer->User = "test@emailarchitect.net";
        oServer->Password = "testpassword";

        // Most mordern SMTP servers require SSL/TLS connection now.
        // ConnectTryTLS means if server supports SSL/TLS, SSL/TLS will be used automatically.
        oServer->ConnectType = SmtpConnectType::ConnectTryTLS;

        // If your SMTP server uses 587 port
        // oServer->Port = 587;

        // If your SMTP server requires SSL/TLS connection on 25/587/465 port
        // oServer->Port = 25; // 25 or 587 or 465
        // oServer->ConnectType = SmtpConnectType::ConnectSSLAuto;

        Console::WriteLine("start to send email from Managed C++...");

        SmtpClient ^oSmtp = gcnew SmtpClient();
        oSmtp->SendMail(oServer, oMail);

        Console::WriteLine("email was sent successfully!");
    }
    catch (Exception ^ep)
    {
        Console::WriteLine("failed to send email with the following error:");
        Console::WriteLine(ep->Message);
    }

    return 0;
}
Remarks
If your SMTP server has implemented DKIM, you don’t have to sign DKIM in your codes, your email will be signed by your server automatically.
TLS 1.2 protocol
TLS is the successor of SSL, more and more SMTP servers require TLS 1.2 encryption now.
If your operating system is Windows XP/Vista/Windows 7/Windows 2003/2008/2008 R2/2012/2012 R2, you need to
enable TLS 1.2 protocol in your operating system like this:
Enable TLS 1.2 on Windows XP/Vista/7/10/Windows 2008/2008 R2/2012
Appendix
- Send Email in Managed C++/CLI - Tutorial
- EASendMail SMTP Component SDK
- Process Bounced Email (Non-Delivery Report) and Email Tracking
- Bulk Email Sender Guidelines
- Work with Email Queue
Comments
If you have any comments or questions about above example codes, please click here to add your comments.
