
Send Email in C# from Windows Store Apps - XAML - UWP - Tutorial
EASendMail is a SMTP component which supports all operations of SMTP/ESMTP protocols (RFC 821, RFC 822, RFC 2554). It also supports Exchange Server Web Service and WebDAV protocols. This tutorial introduces how to send email in C# XAML Windows Store App using SMTP. It also demonstrates SSL, Embedded Images, Asynchronous Mode and Multiple Threads usage.
This tutorial is for C# XAML Windows Store Apps/UWP. If you want to send email in .NET framework application, please go to Send Email in C# from .NET framework - Tutorial
Sections:
Send email in a simple C# XAML Windows Store App project
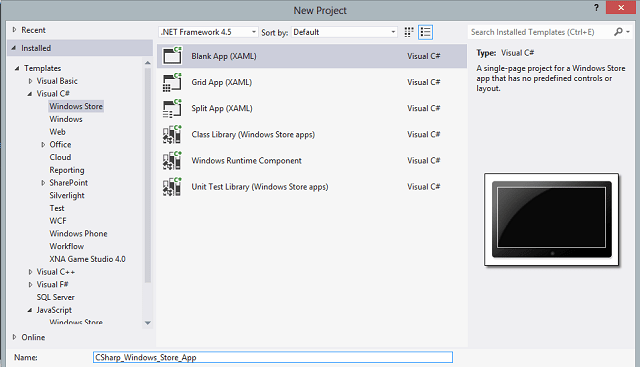
To better demonstrate how to send email using SMTP protocol, let’s create a C# XAML Windows Store App project at first, and then add the reference of EASendMail in your project.
After you created the project, double click “MainPage.xaml” and use “Toolbox” to put a Button and a TextBlock control on the XAML page. Set Button control name to “btnSend” and set TextBlock control name to “textStatus”.

The source code in MainPage.xaml is like this:
<Page
    x:Class="CSharp_Windows_Store_App.MainPage"
    xmlns="http://schemas.microsoft.com/winfx/2006/xaml/presentation"
    xmlns:x="http://schemas.microsoft.com/winfx/2006/xaml"
    xmlns:local="using:CSharp_Windows_Store_App"
    xmlns:d="http://schemas.microsoft.com/expression/blend/2008"
    xmlns:mc="http://schemas.openxmlformats.org/markup-compatibility/2006"
    mc:Ignorable="d">
    <Grid Background="{StaticResource ApplicationPageBackgroundThemeBrush}">
        <Button Content="Button" Name="btnSend"  HorizontalAlignment="Left"
     Height="48" Margin="409,100,0,0" VerticalAlignment="Top" Width="182"/>
        <TextBlock HorizontalAlignment="Left" Name="textStatus" Height="32"
     Margin="409,246,0,0" TextWrapping="Wrap" Text="TextBlock" VerticalAlignment="Top" Width="863"/>
    </Grid>
</Page>
Installation
EASendMail is a SMTP component which supports all operations of SMTP/ESMTP protocols (RFC 821, RFC 822, RFC 2554). It also supports Exchange Web Service (EWS) and WebDAV protocols. Before you can use the following example codes, you should download the EASendMail Installer and install it on your machine at first.
Install from NuGet
You can also install the run-time assembly by NuGet. Run the following command in the NuGet Package Manager Console:
Install-Package EASendMail
Note
If you install it by NuGet, no sample projects are installed, only .NET assembly is installed.
Add Reference
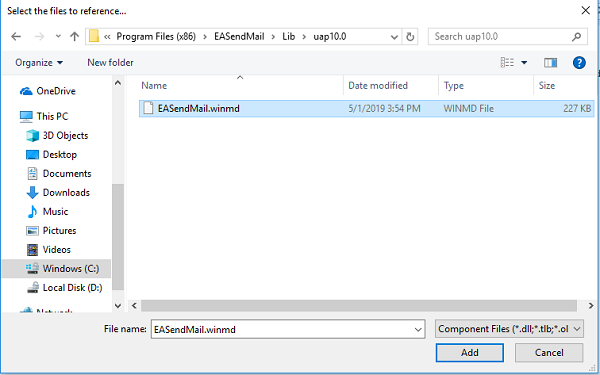
To use EASendMail SMTP Component in your Windows Store App/UWP project, the first step is “Add reference
of EASendMail to your project”. Please create/open your project with Visual Studio,
then select menu -> Project -> Add Reference -> Browse -> Browse..., and
select the Installation Path\Lib\[portable/uap]\EASendMail.winmd from local disk, click Open -> OK, the reference will
be added to your project, and you can start to use EASendMail SMTP
Component in your project.
Windows Runtime Assembly
After compiling your project, a copy of EASendMail.winmd will be generated by compiler
in same folder of your application executable file. Packing all the *.winmd, *.dll and *.exe
in the folder to installer is ok. As EASendMail.winmd is a pure Windows 8/10 Runtime Component, it doesn’t
require “Regsvr32” (self-register) to register the dll.
| File | .NET Framework Version |
| Lib\portable-win81+wpa81\EASendMail.winmd |
Built with .NET Framework 4.5.1
It requires Windows Store App Runtime 8.1 or later version. |
| Lib\uap10.0\EASendMail.winmd |
Built with Universal Windows Platform.
It requires Windows 10 or later version (Universal Windows Platform). |
Now, please double-click the Button on the XAML page, VS 2012 will generate the codes for OnClick event automatically. The source codes in MainPage.xaml.cs is like this:
using System;
using System.Collections.Generic;
using System.IO;
using System.Linq;
using Windows.Foundation;
using Windows.Foundation.Collections;
using Windows.UI.Xaml;
using Windows.UI.Xaml.Controls;
using Windows.UI.Xaml.Controls.Primitives;
using Windows.UI.Xaml.Data;
using Windows.UI.Xaml.Input;
using Windows.UI.Xaml.Media;
using Windows.UI.Xaml.Navigation;

namespace CSharp_Windows_Store_App
{
    /// <summary>
    /// An empty page that can be used on its own or navigated to within a Frame.
    /// </summary>
    public sealed partial class MainPage : Page
    {
        public MainPage()
        {
            this.InitializeComponent();
        }

        /// <summary>
        /// Invoked when this page is about to be displayed in a Frame.
        /// </summary>
        /// <param name="e">Event data that describes how this page was reached.  The Parameter
        /// property is typically used to configure the page.</param>
        protected override void OnNavigatedTo(NavigationEventArgs e)
        {
        }

        private void btnSend_Click(object sender, RoutedEventArgs e)
        {

        }
    }
}
[C# - Send email from Windows Store App - XAML]
Now add the following codes to the project and change From, To, Server, User and
Password to corresponding value and compile your project.
using System;
using System.Collections.Generic;
using System.IO;
using System.Linq;
using Windows.Foundation;
using Windows.Foundation.Collections;
using Windows.UI.Xaml;
using Windows.UI.Xaml.Controls;
using Windows.UI.Xaml.Controls.Primitives;
using Windows.UI.Xaml.Data;
using Windows.UI.Xaml.Input;
using Windows.UI.Xaml.Media;
using Windows.UI.Xaml.Navigation;

// Add EASendMail and Tasks Namespace
using System.Threading.Tasks;
using EASendMail;

namespace CSharp_Windows_Store_App
{
    public sealed partial class MainPage : Page
    {
        public MainPage()
        {
            this.InitializeComponent();
        }

        protected override void OnNavigatedTo(NavigationEventArgs e)
        {
        }

        private async void btnSend_Click(object sender, RoutedEventArgs e)
        {
            btnSend.IsEnabled = false;
            await Send_Email();
            btnSend.IsEnabled = true;
        }

        private async Task Send_Email()
        {
            String Result = "";
            try
            {
                SmtpMail oMail = new SmtpMail("TryIt");
                SmtpClient oSmtp = new SmtpClient();

                // Set sender email address, please change it to yours
                oMail.From = new MailAddress("test@emailarchitect.net");
                // Add recipient email address, please change it to yours
                oMail.To.Add(new MailAddress("support@emailarchitect.net"));

                // Set email subject and email body text
                oMail.Subject = "test email from C# XAML project";
                oMail.TextBody = "this is a test email sent from Windows Store App, do not reply";

                // Your SMTP server address
                SmtpServer oServer = new SmtpServer("smtp.emailarchitect.net");

                // User and password for SMTP authentication
                oServer.User = "test@emailarchitect.net";
                oServer.Password = "testpassword";

                // If your SMTP server requires TLS connection on 25 port, please add this line
                // oServer.ConnectType = SmtpConnectType.ConnectSSLAuto;

                // If your SMTP server requires SSL connection on 465 port, please add this line
                // oServer.Port = 465;
                // oServer.ConnectType = SmtpConnectType.ConnectSSLAuto;

                await oSmtp.SendMailAsync(oServer, oMail);
                Result = "Email was sent successfully!";
            }
            catch (Exception ep)
            {
                Result = String.Format("Failed to send email with the following error: {0}", ep.Message);
            }

            // Display Result by Diaglog box
            Windows.UI.Popups.MessageDialog dlg = new
                Windows.UI.Popups.MessageDialog(Result);

            await dlg.ShowAsync();
        }
    }
}
If you set everything right, click the button, you can get “email was sent successfully”. If you get “failed to send email with the following error:”, then please have a look at the following section.
Common SMTP Transport Error
When you execute above example code, if it threw an exception about “Networking connection” or “No such host”, it is likely that your SMTP server address is not correct. If it threw an exception about “5xx Relay denied”, it is likely that you did not set user authentication. Another common error is “5xx Must issue a STARTTLS command first” or “No supported authentication marshal found!”, that is because your SMTP server requires user authentication under SSL connection. You can set the SSL connection to solve this problem. You can learn more detail in Troubleshooting section.
Where can I get my SMTP email server address, user and password?
Because each email account provider has different server address, so you should query your SMTP server address from your email account provider. To prevent spreading email from the server, most SMTP servers also require user authentication. User name is your email address or your email address without domain part, it depends on your email provider setting.
When you execute above example code, if you get error about “Networking connection” or “No such host”, it is likely that your SMTP server address is not correct. If you get an error like “5xx Relay denied”, it is likely that you did not set user authentication. Another common error is “5xx Must issue a STARTTLS command first” or “No supported authentication marshal found!”, that is because your SMTP server requires user authentication under SSL connection. You can set the SSL connection to solve this problem.
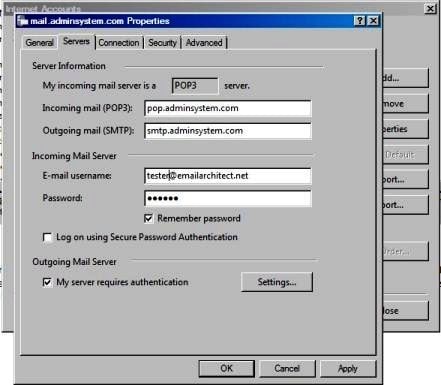
Finally, if you have already set your account in your email client such as Outlook or Window Mail, you can query your SMTP server address, user in your email client. For example, you can choose menu -> “Tools” - > - “Accounts” - > “Your email account” - > “Properties” - > “Servers” in Outlook express or Windows Mail to get your SMTP server, user. Using EASendMail to send email does not require you have email client installed on your machine or MAPI, however you can query your exist email accounts in your email client.
Email Address Syntax and Multiple Recipients
The following example codes demonstrates how to specify display name and email address by different syntax.
// For single email address (From, ReplyTo, ReturnPath), the syntax can be:
// ["][display name]["]<email address>

// For example:
"Tester, T" <test@adminsystem.com>
Tester <test@adminsystem.com>
<test@adminsystem.com>
test@adminsystem.com

// For mulitple email address (To, CC, Bcc), the syntax can be:
// [single email],[single email]...
// (,;\r\n) can be used to separate multiple email addresses.

// For example:
"Tester, T" <test1@adminsystem.com>, Tester2 <test2@adminsystem.com>,
    <test3@adminsystem.com>, test4@adminsystem.com
[C# - Email Address Syntax - Example]
To better understand the email address syntax, please refer to the following codes. It demonstrate how to specify from, to, cc by different email address syntax.
// From is a MailAddress object, it supports implicit converting from string.
// The syntax is like this: "test@adminsystem.com" or "Tester<test@adminsystem.com>"
// The example code without implicit converting:
oMail.From = new MailAddress( "Tester", "test@adminsystem.com" );
oMail.From = new MailAddress( "Tester<test@adminsystem.com>");
oMail.From = new MailAddress( "test@adminsystem.com" );

// To, Cc and Bcc is a AddressCollection object, it supports implicit converting
// from string. Multiple addresses are separated with (,;)
// The syntax is like this: "test@adminsystem.com, test1@adminsystem.com"
// The example code without implicit converting:
oMail.To = new AddressCollection( "test1@adminsystem.com, test2@adminsystem.com" );
oMail.To = new AddressCollection( "Test1<test@adminsystem.com>, Test2<test2@adminsystem.com>");
// You can add more recipient by Add method:
oMail.To.Add( new MailAddress( "tester", "test@adminsystem.com"));

// You can also add carbon copy (CC) or blind carbon copy (BCC) in the email:
oMail.Cc.Add( new MailAddress( "CC recipient", "cc@adminsystem.com"));
oMail.Bcc.Add( new MailAddress( "Bcc recipient", "bcc@adminsystem.com"));
From, ReplyTo, Sender and Return-Path
From, Reply-To, Sender and Return-Path are common email headers in email message. You should always set From property at first, it is a MUST to identify the email sender. The following table lists the header and corresponding properties:
| Header | Property |
| From | SmtpMail.From |
| Reply-To | SmtpMail.ReplyTo |
| Sender | SmtpMail.Sender |
| Return-Path | SmtpMail.ReturnPath |
From
This property indicates the original email sender. This is what you see as the “FROM” in most mail clients.
Reply-To
This property indicates the reply address. Basically, when the user clicks “reply” in mail client, the Reply-To value should be used as the recpient address of the replied email. If you don’t set this property, the Reply address is same as From address.
Sender
This property indicates the who submit/send the email. When the user received the email, the email client displays: From: “sender address” on behalf of “from address”. If you don’t set this property, the Sender address is same as From address. Sender property is common used by mail listing provider. This property also takes effect to DKIM/DomainKeys signature, if Sender is different with From address, then you should sign DKIM/DomainKeys based on Sender domain instead of From address domain.
Return-Path
This property indicates the delivery notification report address. If you don’t set this property, the Return-Path address is same as From address. This property also takes effect to SPF record, if Return-Path is different with From address, then remote SMTP server checkes SPF record of Return-Path instead of From address.
[C# - From, ReplyTo, Sender and Return-Path in Email - Example]
The following example codes demonstrate how to specify From, Reply-To, Sender and Return-Path in Email. With the following example codes:
- If the email couldn’t be delivered to recipient, a non-delivery report will be sent
to
report@emailarchitect.net. - If the user received the email, the email client will display:
sender@emailarchitect.neton behalf offrom@adminsystem.com. - If the user click “reply”, the replied email will be sent to
reply@adminsystem.com.
SmtpMail oMail = new SmtpMail("TryIt");
oMail.From = "from@adminsystem.com";
oMail.ReplyTo = "reply@adminsystem.com";
oMail.Sender = "sender@emailarchitect.net";
oMail.ReturnPath = "report@emailarchitect.net";
Mail Priority
If you want to set Higher or Lower priority to your email, you can use Priority prority
[C# - Mail Priority - Example]
// Set high priority
oMail.Priority = MailPriority.High;
Troubleshooting
When you send email in above simple C# project, if it threw an exception, please have a look at the following tips:
“No Such Host” exception
This error means DNS server cannot resolve SMTP server, you should check if you input correct server address. If your server address is correct, you should check if your DNS server setting is correct.
Common “Networking Connection” Exception
This error means there is a problem with networking connection to SMTP server. You can use Windows built-in Telnet command to detect the networking connection.
Using Telnet to detect networking connection to SMTP server
Note
Notice: in Windows 2008/Windows 8 or later version, Telnet Client is not installed
by default, you should enable this command in Control Panel -> Programs and
Features -> Turn Windows feature on or off -> have Telnet Client checked.
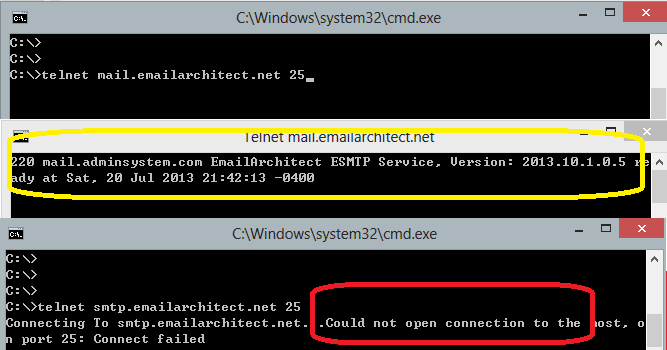
Under DOS command prompt, input “telnet [serveraddress] [port]”:
telnet mail.emailarchitect.net 25
press enter.
If the networking connection to your SMTP server is good, it should return a message
like 220 .... If it returns Could not open connection to ..., that means the
networking connection to SMTP server is bad, or outbound 25 port is blocked by anti-virus
software, firewall or ISP. Please have a look at the following screenshot:
SMTP 25, 587, 465 port
25 port is the default SMTP server port to receive email. However, some ISP block outbound 25 port to prevent user to send email directly to other SMTP server. Therefore, many email providers also provide an alternative port 587 to receive email from such users. 465 port is the common port used to receive email over implicit SSL connection. If you use telnet to test 465 port, it doesn’t return the “220…”, because it requires SSL hand shake. But if the connection is ok, telnet returns a flash cursor.
“5xx … IP address block or on black list or bad reputation” Exception
This error means SMTP server blocks your IP address or email content. You can try to set user/password in your codes to do user authentication and try it again. If email client set user authentication, most SMTP servers do not check client source IP address in black list.
“5xx user authenticaton” Exception
TThis error means user authentication is failed, you should check whether you input correct user/password. Password is always case-sensitive.
“5xx relay denied” Exception
For anti-spam policy, most SMTP servers do not accept the email to outbound domain without user authentication. You should set user/password in the codes and try it again.
“5xx Must issue a STARTTLS command first”
This error means SMTP server requires SSL/TLS connection. You should enable SSL/TLS connection like this:
// If your smtp server requires TLS connection, please add this line
oServer.ConnectType = SmtpConnectType.ConnectSSLAuto;
“No supported authentication marshal found!”
This error means SMTP server doesn’t support user authentication or it requires user authentication over SSL/TLS connection. You can try to remove user/password in your codes and try it again.
Other error returned by SMTP server
If SMTP server returns an error, it usually returns description about this error. Some descriptions also include a HTTP link, you can go to this linked web page to learn more detail. You can also use the following codes to generate a log file to learn all SMTP session between client and server.
[C# - Using log file to detect SMTP server response - Example]
// add this line here to generate log file
oSmtp.LogFileName = "ms-appdata:///local/smtp.txt";
oSmtp.SendMail(oServer, oMail);
Next Section
In this section, I introduced how to send email in a simple C# XAML project using SMTP protocol. At next section I will introduce how to send email over SSL/TLS connection.
Appendix
- EASendMail SMTP Component SDK
- Process Bounced Email (Non-Delivery Report) and Email Tracking
- Bulk Email Sender Guidelines
Comments
If you have any comments or questions about above example codes, please click here to add your comments.