VB6 - Send email over TLS on 25 or 587 port
The following vb6 example codes demonstrate how to send email over TLS on 25 or 587 SMTP port.
SSL and TLS
SSL connection encrypts data between the SMTP component and SMTP server to protects user, password and email content in TCP/IP level. Now this technology is commonly used and many SMTP servers are deployed with SSL such as Gmail, Yahoo and Hotmail. There are two ways to deploy SSL on SMTP server:
Explicit SSL (TLS)
Using STARTTLS command to switch SSL channel on normal SMTP port (25 or 587);
Implicit SSL
Deploying SSL on another port (465 or other port, you may query it from your server administrator
EASendMail SMTP component supports both ways. The connection can be specified by Mail.ConnectType property. Please see the following example code.
TLS 1.2 protocol
TLS is the successor of SSL, more and more SMTP servers require TLS 1.2 encryption now.
If your operating system is Windows XP/Vista/Windows 7/Windows 2003/2008/2008 R2/2012/2012 R2, you need to
enable TLS 1.2 protocol in your operating system like this:
Enable TLS 1.2 on Windows XP/Vista/7/10/Windows 2008/2008 R2/2012
Installation
EASendMail is a SMTP component which supports all operations of SMTP/ESMTP protocols (RFC 821, RFC 822, RFC 2554). Before you can use the following example codes, you should download the EASendMail Installer and install it on your machine at first.
Add reference in VB6
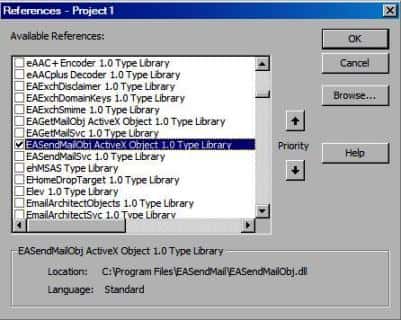
To use EASendMail SMTP ActiveX Object in your project, the first step is “Add reference
of EASendMail to your project”. Please select menu -> Project -> References ->
and select EASendMailObj ActiveX Object, click OK, the reference will be added
to current project, and you can start to use it to send email in your VB6 project.
Add reference in VBA (EXCEL/Access/Outlook)
Open VBA IDE by press Alt+F11, Please select menu -> Tools -> References -> and select EASendMailObj ActiveX Object,
click OK, the reference will be added to current VBA project, and you can start to use it to send email in your VBA project.

VB6 - Send email over TLS on 25 or 587 port - example
The following example codes demonstrate how to send email over TLS connection on 25 or 587 port.
In order to run it correctly, please change SMTP server, user, password, sender, recipient value to yours.
Note
To get full sample projects, please download and install EASendMail on your machine.
Const ConnectNormal = 0
Const ConnectSSLAuto = 1
Const ConnectSTARTTLS = 2
Const ConnectDirectSSL = 3
Const ConnectTryTLS = 4

Private Sub btnSendMail_Click()

    Dim oSmtp As New EASendMailObjLib.Mail
    oSmtp.LicenseCode = "TryIt"

    ' Set your sender email address
    oSmtp.FromAddr = "test@emailarchitect.net"
    ' Add recipient email address
    oSmtp.AddRecipientEx "support@emailarchitect.net", 0

    ' Set email subject
    oSmtp.Subject = "simple email from VB 6.0 over TLS 25 port"
    ' Set email body
    oSmtp.BodyText = "this is a test email sent from VB 6.0 project, do not reply"

    ' Your SMTP server address
    oSmtp.ServerAddr = "smtp.emailarchitect.net"

    ' User and password for ESMTP authentication, if your server doesn't require
    ' User authentication, please remove the following codes.
    oSmtp.UserName = "test@emailarchitect.net"
    oSmtp.Password = "testpassword"

    ' Set 25 or 587 SMTP port
    oSmtp.ServerPort = 25

    ' Enable TLS/SSL connection
    oSmtp.ConnectType = ConnectSSLAuto

    MsgBox "start to send email ..."

    If oSmtp.SendMail() = 0 Then
        MsgBox "email was sent successfully!"
    Else
        MsgBox "failed to send email with the following error:" & oSmtp.GetLastErrDescription()
    End If

End Sub
32bit/x64 ActiveX DLL
Seperate builds of run-time dll for 32 and x64 platform
| File | Platform |
| Installation Path\Lib\native\x86\EASendMailObj.dll | 32 bit |
| Installation Path\Lib\native\x64\EASendMailObj.dll | 64 bit |
Distribution
Standard EXE
For VB6, C++, Delphi or other standard exe application, you can distribute EASendMailObj.dll with your application to target machine without COM-registration and installer. To learn more detail, please have a look at Registration-free COM with Manifest File.
Script
For ASP, VBScript, VBA, MS SQL Stored Procedure, you need to install EASendMail on target machine by EASendMail installer, both 32bit/x64 DLL are installed and registered.
Appendix
- Send Email in VB 6.0 - Tutorial
- EASendMail SMTP Component SDK
- Process Bounced Email (Non-Delivery Report) and Email Tracking
- Bulk Email Sender Guidelines
- Work with Email Queue
Comments
If you have any comments or questions about above example codes, please click here to add your comments.
