
C#/ASP.NET/ASP MVC - Send email using Microsoft OAuth 2.0 (Modern Authentication) + EWS/Ms Graph API/SMTP protocol from Office 365 in background service
You can send email using traditional user/password authentication from Office 365 account by EWS/SMTP Protocol.
However Microsoft has disabled traditional user authentication in many tenants, switching to Microsoft OAuth (Modern Authentication) is strongly recommended now.
In this topic, I will introduce how to send email using C# and Microsoft OAuth (Modern Authentication) in background service.
Sections:
- Installation
- Add reference
- .NET assembly
- Office 365 OAuth 2.0 client credentials grant
- Register the application in Azure Portal
- Register application
- Find the application id (client id) and tenant id
- Assign API permission
- Graph API permission
- Add Mail.Send and Mail.ReadWrite permission
- EWS and SMTP/POP/IMAP permission
- Add full_access_app permission
- Add POP.AccessAsApp permission
- Add IMAP.AccessAsApp permission
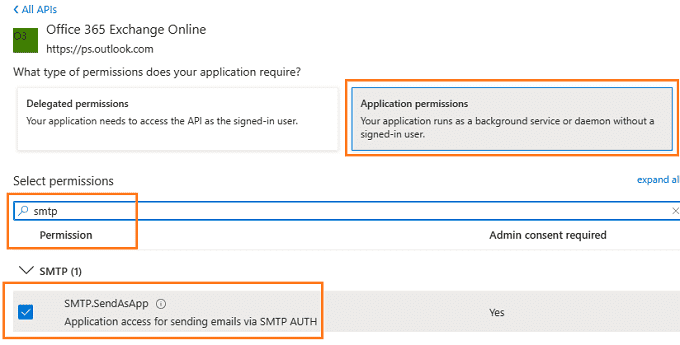
- Add SMTP.AccessAsApp permission
- Complete permissions list
- Grant admin consent in API permission
- Create client secret
- Store client secret value
- Enable TLS Strong Encryption Algorithms in .NET 2.0 and .NET 4.0
- C#/ASP.NET/ASP MVC - Send email using Graph API + Microsoft OAuth from Office 365 Account in background service - example
- C#/ASP.NET/ASP MVC - Send email using EWS + Microsoft OAuth from Office 365 Account in background service - example
- Register SMTP/POP/IMAP service principals in Exchange
- Find APPLICATION_ID and OBJECT_ID
- Open Exchange Online PowerShell
- Create service principal
- Query service principal
- Add permission to specific user
- Query permission
- C#/ASP.NET/ASP MVC - Send email using SMTP + Microsoft OAuth from Office 365 Account in background service - example
- Access token lifetime
- TLS 1.2 protocol
- EA Oauth Service for Office 365
- Related links
Installation
Before you can use the following codes, please download EASendMail SMTP Component and install it on your machine at first. Full sample proejcts are included in this installer.
Install from NuGet
You can also install the run-time assembly by NuGet. Run the following command in the NuGet Package Manager Console:
Install-Package EASendMail
Note
If you install it by NuGet, no sample projects are installed, only .NET assembly is installed. And you also need to get a trial license code from here instead of using “TryIt”.
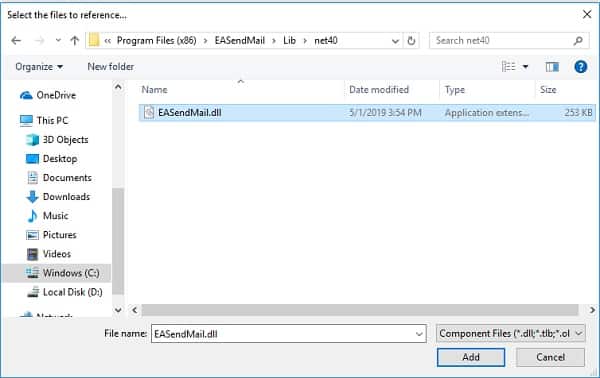
Add reference
To use EASendMail SMTP Component in your project, the first step is Add reference
of EASendMail to your project. Please create or open your project with Visual Studio,
then go to menu -> Project -> Add Reference -> .NET -> Browse..., and select
Installation Path\Lib\net[version]\EASendMail.dll from your disk, click Open -> OK, the reference of EASendMail
will be added to your project, and you can start to use it to send email
in your project.
.NET assembly
Because EASendMail has separate builds for .Net Framework, please refer to the following table and choose the correct dll.
Separate builds of run-time assembly for .NET Framework 2.0, 3.5, 4.0, 4.5, 4.6.1, 4.7.2, 4.8.1, .NET 6.0, .NET 7.0, .NET 8.0, .NET Standard 2.0 and .NET Compact Framework 2.0, 3.5.
| File | .NET Framework Version |
| Lib\[net20|40|45|461|472|481]\EASendMail.dll |
Built with .NET Framework 2.0, 4.0, 4.5, 4.6.1, 4.7.2, 4.8.1
It requires .NET Framework 2.0, 3.5 or later version. |
| Lib\[net6.0|7.0|8.0]\EASendMail.dll |
Built with .NET 6.0, .NET 7.0, .NET 8.0
It requires .NET 6.0 or later version. |
| Lib\netstandard2.0\EASendMail.dll |
Built with .NET Standard 2.0
It requires .NET Standard 2.0 or later version. |
| Lib\[net20-cf|net35-cf]\EASendMail.dll |
Built with .NET Compact Framework 2.0, 3.5
It requires .NET Compact Framework 2.0, 3.5 or later version. |
Office 365 OAuth 2.0 client credentials grant
Normal OAuth requires user to input user and password in browser for authentication. Obviously, it is not suitable for background service.
The solution is granting admin consent to the azure application, then the application
can use the client secret value to request the access token directly.
This way doesn’t require user attending, it is suitable for background service.
This tutorial introduces how to register application for background service in Azure Portal,
then assign the Graph API/EWS/SMTP/POP/IMAP API permission to the application and add the access right to the mailbox of specific user.
Register the application in Azure Portal
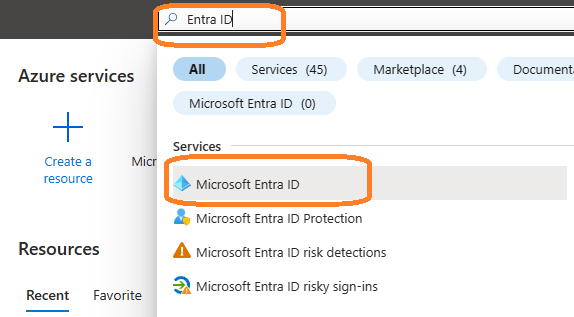
Sign in to the Azure Portal using the Microsoft account of the Office 365 administrator.
If your account gives you access to more than one tenant, select your account in the top right corner, and set your portal session to the Azure AD tenant that you want.
Search Microsoft Entra ID (old name “Azure Active Directory”) and go to this service:
Register application
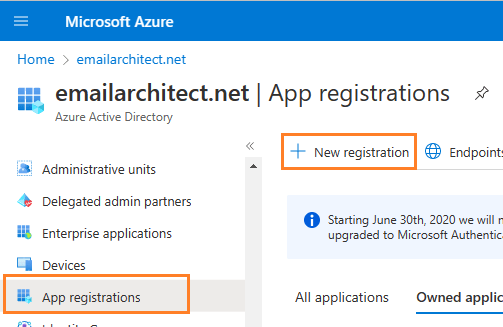
In the left-hand navigation pane, select the Microsoft Entra ID service, and then select -> Manage -> App registrations -> New registration.
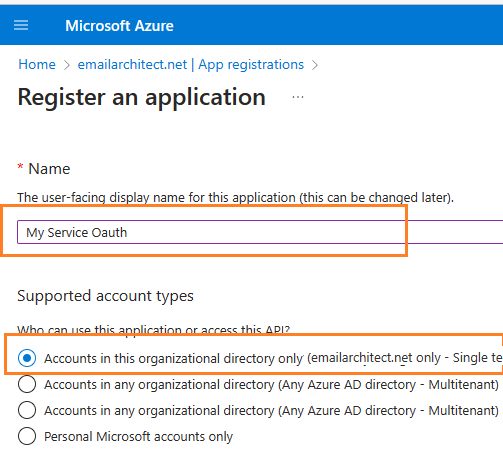
Input a name to to register the application:
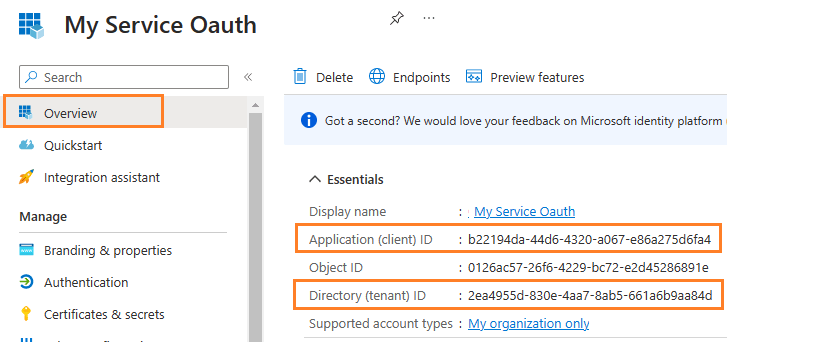
Find the application id (client id) and tenant id
After the application is registered, you can click Overview to find the client id and tenant id.
These are required parameters for requesting access token.
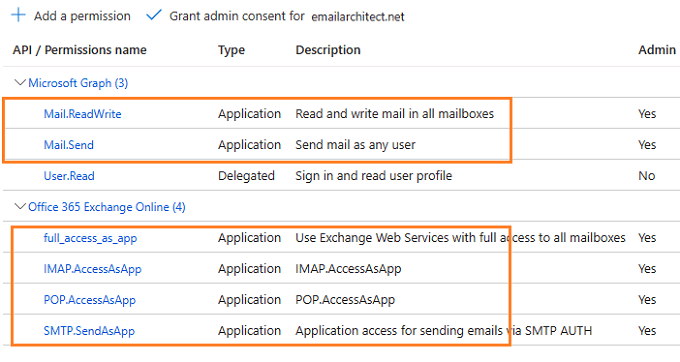
Assign API permission
Now you need to assign API permission to the application by clicking Manage -> API Permission -> Add a permission.
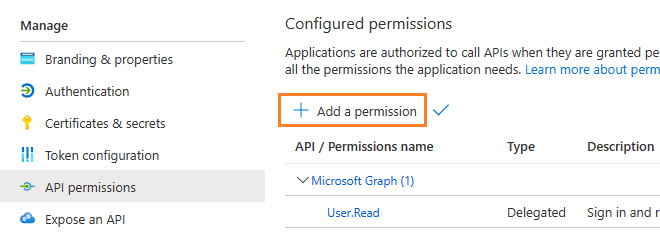
You don’t have to assign all the API permissions below to the application, just assign the API permission(s) you need.
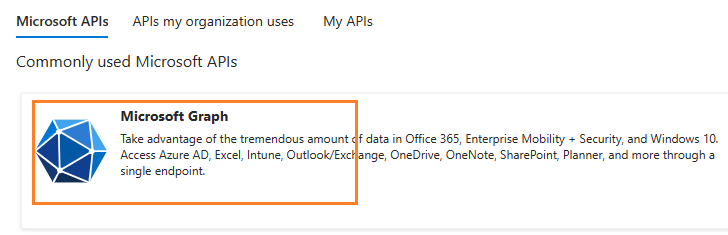
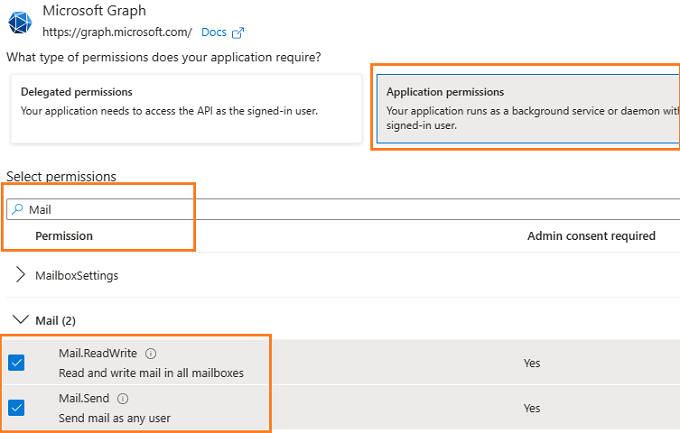
| Protocol | Permission | Scope | |
| Graph API | Mail.Send, Mail.ReadWrite | https://graph.microsoft.com/.default | |
| EWS | full_access_as_app | https://outlook.office365.com/.default | |
| SMTP | SMTP.AccessAsApp | https://outlook.office365.com/.default | |
| POP | POP.AccessAsApp | https://outlook.office365.com/.default | |
| IMAP | IMAP.AccessAsApp | https://outlook.office365.com/.default |
Add Mail.Send and Mail.ReadWrite permission
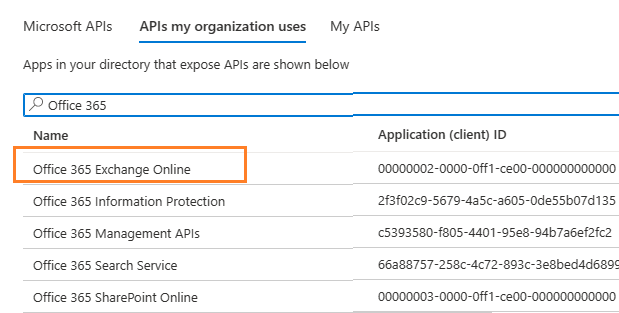
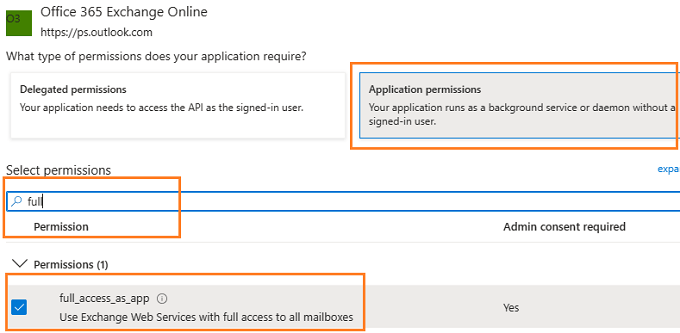
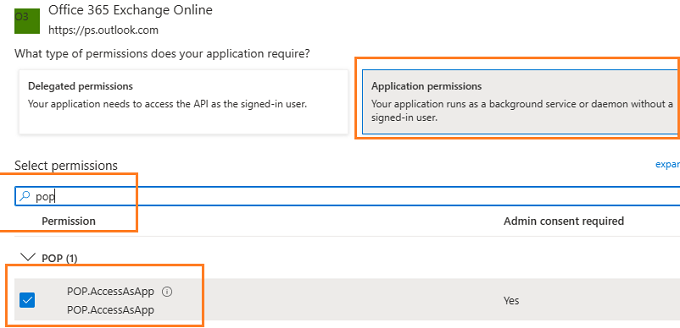
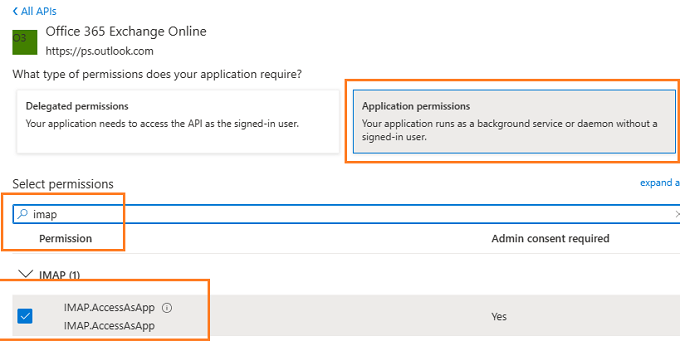
EWS and SMTP/POP/IMAP permission
Go to APIs in my organization uses ->
Office 365 Exchange Online -> Application Permission ->
Add full_access_app permission
Add POP.AccessAsApp permission
Add IMAP.AccessAsApp permission
Add SMTP.AccessAsApp permission
Complete permissions list
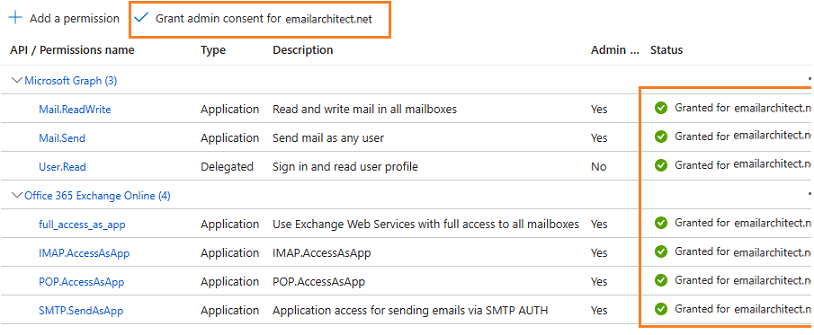
Grant admin consent in API permission
To use the application to access the user mailbox in Office365 domain, you should grant admin consent by Office365 domain administrator.
In API Permission -> Click grant admin consent for ... to grant admin consent to the application.
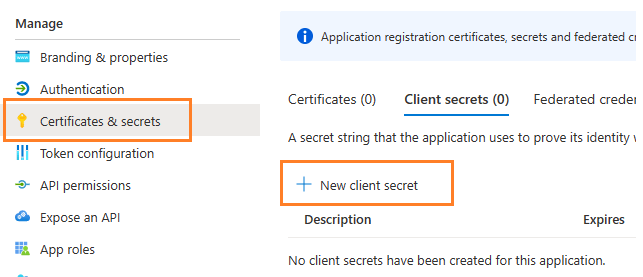
Create client secret
Now we need to create a client secret for the application,
click Certificates and secrets -> client secrets and add a new client secret.

Store client secret value
After client secret is created, store the client secret value to somewhere. It is another required parameter for requesting access token.
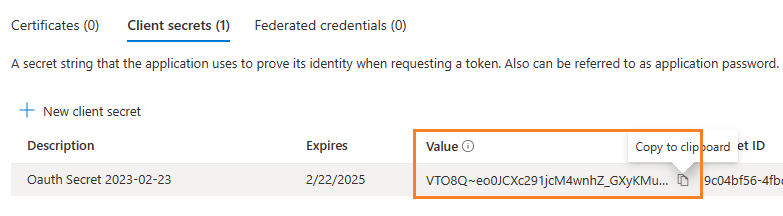
Important
Please store client secret value by yourself, because it is hidden when you view it at next time.
Now you can use the client id, tenant id and client secret value to request access token.
But to use SMTP/POP/IMAP protocol, you need to Register SMTP/POP/IMAP service principals in Exchange as well.
Important
You should create your client id and client secret, do not use the client id from example codes in production environment,
it is used for test purpose. If you got "This app isn't verified" information, please click "Advanced" -> Go to ... for test.
Enable TLS Strong Encryption Algorithms in .NET 2.0 and .NET 4.0
Because HttpWebRequest is used to get access token from web service.
If you’re using .NET framework (.NET 2.0 - 3.5 and .NET 4.x),
you need to enable Strong Encryption Algorithms to request access token:
Put the following content to a file named NetStrongEncrypt.reg, right-click this file -> Merge -> Yes.
You can also download it from https://www.emailarchitect.net/webapp/download/NetStrongEncrypt.zip.
Windows Registry Editor Version 5.00

[HKEY_LOCAL_MACHINE\SOFTWARE\Microsoft\.NETFramework\v2.0.50727]
"SystemDefaultTlsVersions"=dword:00000001
"SchUseStrongCrypto"=dword:00000001

[HKEY_LOCAL_MACHINE\SOFTWARE\Wow6432Node\Microsoft\.NETFramework\v2.0.50727]
"SystemDefaultTlsVersions"=dword:00000001
"SchUseStrongCrypto"=dword:00000001

[HKEY_LOCAL_MACHINE\SOFTWARE\Microsoft\.NETFramework\v4.0.30319]
"SystemDefaultTlsVersions"=dword:00000001
"SchUseStrongCrypto"=dword:00000001

[HKEY_LOCAL_MACHINE\SOFTWARE\Wow6432Node\Microsoft\.NETFramework\v4.0.30319]
"SystemDefaultTlsVersions"=dword:00000001
"SchUseStrongCrypto"=dword:00000001
Now you can use the following example codes to send email with Graph API or EWS protocol:
C#/ASP.NET/ASP MVC - Send email using Graph API + Microsoft OAuth from Office 365 Account in background service - example
using System;
using System.Text;
using System.IO;
using System.Net;
using EASendMail;

static string _postString(string uri, string requestData)
{
    HttpWebRequest httpRequest = WebRequest.Create(uri) as HttpWebRequest;
    httpRequest.Method = "POST";
    httpRequest.ContentType = "application/x-www-form-urlencoded";

    using (Stream requestStream = httpRequest.GetRequestStream())
    {
        byte[] requestBuffer = Encoding.UTF8.GetBytes(requestData);
        requestStream.Write(requestBuffer, 0, requestBuffer.Length);
        requestStream.Close();
    }

    try
    {
        HttpWebResponse httpResponse = httpRequest.GetResponse() as HttpWebResponse;
        using (StreamReader reader = new StreamReader(httpResponse.GetResponseStream()))
        {
            // reads response body
            string responseText = reader.ReadToEnd();
            Console.WriteLine(responseText);
            return responseText;
        }
    }
    catch (WebException ex)
    {
        if (ex.Status == WebExceptionStatus.ProtocolError)
        {
            var response = ex.Response as HttpWebResponse;
            if (response != null)
            {
                Console.WriteLine("HTTP: " + response.StatusCode);
                using (StreamReader reader = new StreamReader(response.GetResponseStream()))
                {
                    // reads response body
                    string responseText = reader.ReadToEnd();
                    Console.WriteLine(responseText);
                }
            }
        }

        throw;
    }
}

public void SendMail()
{
    try
    {
        string client_id = "b22194da-44d6-4320-a067-e86a275d6fa4";
        string client_secret = "VTO8Q~eo0JCXc291jcM4wnhZ_GXyKMu.";

        // If your application is not created by Office365 administrator,
        // please use Office365 directory tenant id, you should ask Offic365 administrator to send it to you.
        // Office365 administrator can query tenant id in https://portal.azure.com/ - Azure Active Directory.
        string tenant = "2ea4955d-830e-4aa7-8ab5-661a6b9aa84d";

        string requestData =
            string.Format("client_id={0}&client_secret={1}&scope=https://graph.microsoft.com/.default&grant_type=client_credentials",
                client_id, client_secret);

        string tokenUri = string.Format("https://login.microsoftonline.com/{0}/oauth2/v2.0/token", tenant);
        string responseText = _postString(tokenUri, requestData);

        OAuthResponseParser parser = new OAuthResponseParser();
        parser.Load(responseText);

        string officeUser = "user@mydomain.onmicrosoft.com";

        // Set Ms Graph API server and protocol
        var server = new SmtpServer("graph.microsoft.com");
        server.Protocol = ServerProtocol.MsGraphApi;

        server.User = officeUser;
        server.Password = parser.AccessToken;
        server.AuthType = SmtpAuthType.XOAUTH2;

        server.ConnectType = SmtpConnectType.ConnectSSLAuto;

        var mail = new SmtpMail("TryIt");

        mail.From = officeUser;
        mail.To = "support@emailarchitect.net";

        mail.Subject = "Office 365 background service oauth test";
        mail.TextBody = "this is a test, don't reply";

        var smtp = new SmtpClient();
        smtp.SendMail(server, mail);

        Console.WriteLine("Message delivered!");
    }
    catch (Exception ep)
    {
        Console.WriteLine(ep.ToString());
    }
}
C#/ASP.NET/ASP MVC - Send email using EWS + Microsoft OAuth from Office 365 Account in background service - example
using System;
using System.Text;
using System.IO;
using System.Net;
using EASendMail;

static string _postString(string uri, string requestData)
{
    HttpWebRequest httpRequest = WebRequest.Create(uri) as HttpWebRequest;
    httpRequest.Method = "POST";
    httpRequest.ContentType = "application/x-www-form-urlencoded";

    using (Stream requestStream = httpRequest.GetRequestStream())
    {
        byte[] requestBuffer = Encoding.UTF8.GetBytes(requestData);
        requestStream.Write(requestBuffer, 0, requestBuffer.Length);
        requestStream.Close();
    }

    try
    {
        HttpWebResponse httpResponse = httpRequest.GetResponse() as HttpWebResponse;
        using (StreamReader reader = new StreamReader(httpResponse.GetResponseStream()))
        {
            // reads response body
            string responseText = reader.ReadToEnd();
            Console.WriteLine(responseText);
            return responseText;
        }
    }
    catch (WebException ex)
    {
        if (ex.Status == WebExceptionStatus.ProtocolError)
        {
            var response = ex.Response as HttpWebResponse;
            if (response != null)
            {
                Console.WriteLine("HTTP: " + response.StatusCode);
                using (StreamReader reader = new StreamReader(response.GetResponseStream()))
                {
                    // reads response body
                    string responseText = reader.ReadToEnd();
                    Console.WriteLine(responseText);
                }
            }
        }

        throw ex;
    }
}

public void SendMail()
{
    try
    {
        string client_id = "b22194da-44d6-4320-a067-e86a275d6fa4";
        string client_secret = "VTO8Q~eo0JCXc291jcM4wnhZ_GXyKMu.";

        // If your application is not created by Office365 administrator,
        // please use Office365 directory tenant id, you should ask Offic365 administrator to send it to you.
        // Office365 administrator can query tenant id in https://portal.azure.com/ - Azure Active Directory.
        string tenant = "2ea4955d-830e-4aa7-8ab5-661a6b9aa84d";

        string requestData =
            string.Format("client_id={0}&client_secret={1}&scope=https://outlook.office365.com/.default&grant_type=client_credentials",
                client_id, client_secret);

        string tokenUri = string.Format("https://login.microsoftonline.com/{0}/oauth2/v2.0/token", tenant);
        string responseText = _postString(tokenUri, requestData);

        OAuthResponseParser parser = new OAuthResponseParser();
        parser.Load(responseText);

        string officeUser = "user@mydomain.onmicrosoft.com";
        var server = new SmtpServer("outlook.office365.com");
        server.Protocol = ServerProtocol.ExchangeEWS;
        server.User = officeUser;

        server.Password = parser.AccessToken;
        server.AuthType = SmtpAuthType.XOAUTH2;
        server.ConnectType = SmtpConnectType.ConnectSSLAuto;

        var mail = new SmtpMail("TryIt");

        mail.From = officeUser;
        mail.To = "support@emailarchitect.net";

        mail.Subject = "Office 365 background service oauth test";
        mail.TextBody = "this is a test, don't reply";

        var smtp = new SmtpClient();
        smtp.SendMail(server, mail);

        Console.WriteLine("Message delivered!");
    }
    catch (Exception ep)
    {
        Console.WriteLine(ep.ToString());
    }
}
Register SMTP/POP/IMAP service principals in Exchange
Although the application is consented by the tenant admin, but to access SMTP/POP/IMAP service, the tenant administrator still need to register your application as service principal in Exchange via Exchange Online PowerShell. This is enabled by the New-ServicePrincipal cmdlet.
New-ServicePrincipal -AppId <APPLICATION_ID> -ServiceId <OBJECT_ID>
Find APPLICATION_ID and OBJECT_ID
You should find your APPLICATION_ID and OBJECT_ID before running above cmdlet.
Go to Overview -> Managed application in local directory:
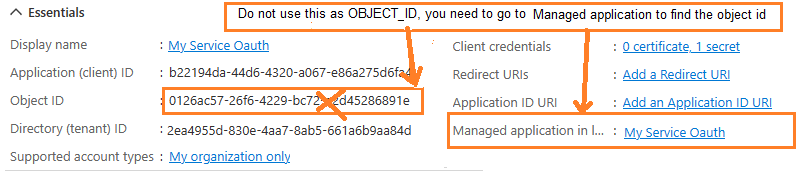
After you click your application name in Managed application in l...,
you can see Application ID and Object ID for New-ServicePrincipal cmdlet.

Open Exchange Online PowerShell
Now you need to open Exchange Online PowerShell to run the cmdlet. If you have not installed the module, you can use the Install-Module cmdlet to install the module from the PowerShell Gallery.
Install-Module -Name ExchangeOnlineManagement
After you’ve installed the module, open a PowerShell window and load the module by running the following command:
Import-Module ExchangeOnlineManagement
Connect-ExchangeOnline -UserPrincipalName "admin@yourdomain.onmicrosoft.com"
Create service principal
After Exchange Online PowerShell is connected successfully, run the following cmdlet to create a new service principal:
The ServiceId is the OBJECT_ID and the AppId is APPLICATION_ID found in Find APPLICATION_ID and OBJECT_ID
New-ServicePrincipal -AppId "b22194da-44d6-4320-a067-e86a275d6fa4" -ServiceId "71941e67-ef24-45e8-bd22-dfd53790bb77"
Query service principal
After you create the service principal, you can query it by:
Get-ServicePrincipal
Add permission to specific user
You can now add the specific mailboxes in the tenant that will be allowed to be access by your application. This is done with the Add-MailboxPermission cmdlet.
Add-MailboxPermission -Identity <mailboxIdParameter> -User <SecurityPrincipalIdParameter|OBJECT_ID> -AccessRights <MailboxRights[]>
For example:
Add-MailboxPermission -Identity "grant-test@emailarchitect.net" -User "71941e67-ef24-45e8-bd22-dfd53790bb77" -AccessRights FullAccess
Query permission
You can also query the permission by:
Get-MailboxPermission -Identity "grant-test@emailarchitect.net"
Now you can use SMTP protocol to send email by the following codes:
C#/ASP.NET/ASP MVC - Send email using SMTP + Microsoft OAuth from Office 365 Account in background service - example
using System;
using System.Text;
using System.IO;
using System.Net;
using EASendMail;

static string _postString(string uri, string requestData)
{
    HttpWebRequest httpRequest = WebRequest.Create(uri) as HttpWebRequest;
    httpRequest.Method = "POST";
    httpRequest.ContentType = "application/x-www-form-urlencoded";

    using (Stream requestStream = httpRequest.GetRequestStream())
    {
        byte[] requestBuffer = Encoding.UTF8.GetBytes(requestData);
        requestStream.Write(requestBuffer, 0, requestBuffer.Length);
        requestStream.Close();
    }

    try
    {
        HttpWebResponse httpResponse = httpRequest.GetResponse() as HttpWebResponse;
        using (StreamReader reader = new StreamReader(httpResponse.GetResponseStream()))
        {
            // reads response body
            string responseText = reader.ReadToEnd();
            Console.WriteLine(responseText);
            return responseText;
        }
    }
    catch (WebException ex)
    {
        if (ex.Status == WebExceptionStatus.ProtocolError)
        {
            var response = ex.Response as HttpWebResponse;
            if (response != null)
            {
                Console.WriteLine("HTTP: " + response.StatusCode);
                using (StreamReader reader = new StreamReader(response.GetResponseStream()))
                {
                    // reads response body
                    string responseText = reader.ReadToEnd();
                    Console.WriteLine(responseText);
                }
            }
        }

        throw ex;
    }
}

public void SendMail()
{
    try
    {
        string client_id = "b22194da-44d6-4320-a067-e86a275d6fa4";
        string client_secret = "VTO8Q~eo0JCXc291jcM4wnhZ_GXyKMu.";

        // If your application is not created by Office365 administrator,
        // please use Office365 directory tenant id, you should ask Offic365 administrator to send it to you.
        // Office365 administrator can query tenant id in https://portal.azure.com/ - Azure Active Directory.
        string tenant = "2ea4955d-830e-4aa7-8ab5-661a6b9aa84d";

        string requestData =
            string.Format("client_id={0}&client_secret={1}&scope=https://outlook.office365.com/.default&grant_type=client_credentials",
                client_id, client_secret);

        string tokenUri = string.Format("https://login.microsoftonline.com/{0}/oauth2/v2.0/token", tenant);
        string responseText = _postString(tokenUri, requestData);

        OAuthResponseParser parser = new OAuthResponseParser();
        parser.Load(responseText);

        string officeUser = "grant-test@emailarchitect.net";

        // Set SMTP server and protocol
        var server = new SmtpServer("outlook.office365.com");
        server.Port = 587;
        server.Protocol = ServerProtocol.SMTP;

        server.User = officeUser;
        server.Password = parser.AccessToken;
        server.AuthType = SmtpAuthType.XOAUTH2;

        server.ConnectType = SmtpConnectType.ConnectSSLAuto;

        var mail = new SmtpMail("TryIt");

        mail.From = officeUser;
        mail.To = "support@emailarchitect.net";

        mail.Subject = "Office 365 background service oauth test";
        mail.TextBody = "this is a test, don't reply";

        var smtp = new SmtpClient();
        smtp.SendMail(server, mail);

        Console.WriteLine("Message delivered!");
    }
    catch (Exception ep)
    {
        Console.WriteLine(ep.ToString());
    }
}
Access token lifetime
You don’t have to request access token every time. By default,
access token expiration time is 3600 seconds, you can reuse the access token repeatedly before it is expired.
TLS 1.2 protocol
TLS is the successor of SSL, more and more SMTP servers require TLS 1.2 encryption now.
If your operating system is Windows XP/Vista/Windows 7/Windows 2003/2008/2008 R2/2012/2012 R2, you need to
enable TLS 1.2 protocol in your operating system like this:
Enable TLS 1.2 on Windows XP/Vista/7/10/Windows 2008/2008 R2/2012
EA Oauth Service for Office 365
If you are not the tenant administrator and you don’t have the permission to create or grant the application in Azure, or if your code is too complex or out of maintenance, and you don’t want to change anything in your source codes, then you can have a try with EA Oauth Service for Offic365. It provides an easy way for the legacy email application that doesn’t support OAUTH 2.0 to send and retrieve email from Office 365 without changing any codes. SMTP, POP, IMAP and SSL/TLS protocols are supported.
Appendix
- Send Email in C# - Tutorial
- EASendMail SMTP Component SDK
- Process Bounced Email (Non-Delivery Report) and Email Tracking
- Bulk Email Sender Guidelines
- Work with Email Queue
Comments
If you have any comments or questions about above example codes, please click here to add your comments.